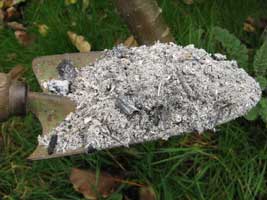
Turn your wood burning ashes into a useful nutrient for your garden!
Homes with wood stoves and fireplaces for winter heat and backyard fire pits create many tons of ash that can be recycled in our gardens. If you intend to recycle ash from these sources, burn only plain paper or newsprint and clean wood; do not include glossy paper or treated wood. Fall and winter months are the best time to distribute ash in the garden, this way it can settle in to the soil and release its nutrients the following spring.

Find over 1500 All Natural Garden Secrets here!
There are many benefits that come from adding clean burning wood ash in the garden. Ashes contain phosphorous, magnesium, potassium and calcium carbonate, all of which are important in maintaining healthy garden soil. Wood ash has an alkaline pH so is excellent for raising the pH in acid soils. The ash helps deter slugs and a number of other harmful pests. When applied to the soil, it acts much like limestone by raising the pH or alkalinity of the soil. Unlike limestone, wood ash has high water solubility and works quicker to change the soil pH. This may cause a problem in many gardens that tend to have a naturally high soil pH. Wood ashes should not be applied around acid-loving plants, such as azaleas, rhododendrons, and blueberries. Although a soil test is the best way to determine whether wood ashes are needed in your garden soil, an annual application of no more than 20 pounds sprinkled over 1,000 square feet of the lawn or garden in the fall or winter should be safe. In the spring and summer add your clean burning wood ash to the compost pile!
]]>
Brussels sprout plants take up a fair amount of space, they are certainly worth it – nothing better than homegrown! The sprouts, which look like mini cabbages, form along the 2- to 3-foot stems under umbrella-like foliage, and need up to 100 days to mature. Brussels Sprouts are a cool weather crop that grow best at around 60°-65° F. Brussels sprouts survive freezing temperatures better than hot spells. Time your plantings so that overnight fall frosts will bring out the sprouts’ sweetness. Generally treated like broccoli or cauliflower, Brussels sprouts prefer well-drained soil and too much nitrogen will make for lots of leaves but not so much on the sprouts. They want regular and generous watering. Plant into soil recently amended with good fertile organic matter.
To start your Brussels sprout plants from seeds sow seeds 1/2 inch deep.Generally around May-June or count back approximately 100 days for maturity from early frost in winter in your area. When seedlings are 5 to 7 inches tall, space or thin them to 2 feet apart. Set transplants deeper than they grew originally – bury 2 – 3 inches into the soil, with the lowest leaves just above the soil. Firm the ground around the plants, and water well. Mulch well to retain soil moisture, and hand pull any weeds to avoid damaging the shallow roots of the sprout plants. Feed lightly once or twice a month with compost tea or seaweed extract. Stake in areas with strong winds. The leaves will turn yellow as sprouts mature; remove these leaves as they fade to give sprouts room to develop. Harvest once Brussels Sprouts are about 1 – 2 inches in diameter, harvest them as they mature from the bottom of the stalk upward. Remove sprouts by twisting them from the stem.
Problems with bugs?
Use a simple solution of dish soap and water, add garlic cloves and rhubarb leaf if you have them handy, spray infested plants frequently.
Simply boil 1 rhubarb leaf with 2 – 3 garlic cloves in a small pot of water (about 1 liter of water), once cool strain into spray bottle and add 2 tablespoons of dish soap.
The rhubarb acts as a natural pesticide, the garlic deters pests and the dish soap helps it all to stick to the leaves. This solution works great for most pest problems in the vegetable garden!
]]>
Last year I ran out of room in the garden but I still had seed potatoes left over and… I had these great big empty 10 gallon pots. I was very impressed with how well the potatoes grew in here, I harvested upwards of 10-12 pounds per container. And the containers really don’t take up much space!
Or use Potato Grow Bags!
Potato Grow Bags have a porous fabric that air-prunes plant roots, resulting in a robust and healthy root system. Plant up to 5 seedlings in this size Potato Grow Bag!
I put about 3 -4 inches of a third compost and soil mixture on the bottom of the container, planted 4 – 5 seed potatoes, topped with another 2 inches of soil mixture.. as the potatoes grew taller I added more soil, and again.. then Bam! All kinds of potatoes!
Seed Potatoes:
Unlike the potatoes you purchase at the grocery store, seed potatoes, also known as “tubers” and are grown for the purpose of replanting and are not meant for consumption. Organic and heirloom varieties of potatoes can also be used for planting purposes. You can save your own potatoes from season to season for replanting purposes.
Prior to Planting:
Your potatoes need to start to sprout. To do this, leave your seed potatoes in a cool, dark place. A cupboard or closet in the basement works nicely. Keep them in an egg carton or other container to support them and check back each day to look for eyes. Once the eyes/sprouts have began to grow your ready to plant, cut or cube your potato into half or thirds. You do not want to trim the eyes off the potato, treat the pieces as separate seeds. Each piece should weigh between 1.5 and 2 ounces, and each should also have two or three eyes on it.
Get Growing:
The majority of the eyes should face upwards. Space the tubers apart evenly and do not overcrowd the pot. As a general guide, a pot with a diameter of 12 inches should only contain about 3 seed potatoes. After a few weeks to a month you should see leaf growth now it is time to add more of your soil/compost mixture. Only the top 1 inch of leaf growth should be peek through. Keep adding medium until you reach the rim of the pot. Ideally, the soil will be about 18 to 24 inches deep.
Maintenance:
The soil should be moist, but never soggy and never completely dry.
Potatoes need sunlight but do poorly when exposed to direct sunlight for an extended period of time. Partial Shade is best!
Use good quality soil enriched with compost and manure for large quality crops.
When are they Ready?
Rummage around the dirt a few weeks after your plants flower. The first few potatoes will be ready at this time, and you can pluck or twist them off the root. Generally, potatoes that are at least the size of an egg will be ready, but you should pull each spud above the soil and check its color before removing it. Green potatoes are unripe and poisonous. You will be able to tell when the remainder of your potatoes is almost ready by observing how much the foliage has died back. Once the leaves and stems are completely yellow, your potatoes are ready. Stop watering about two weeks before you harvest!
Find what you need here:
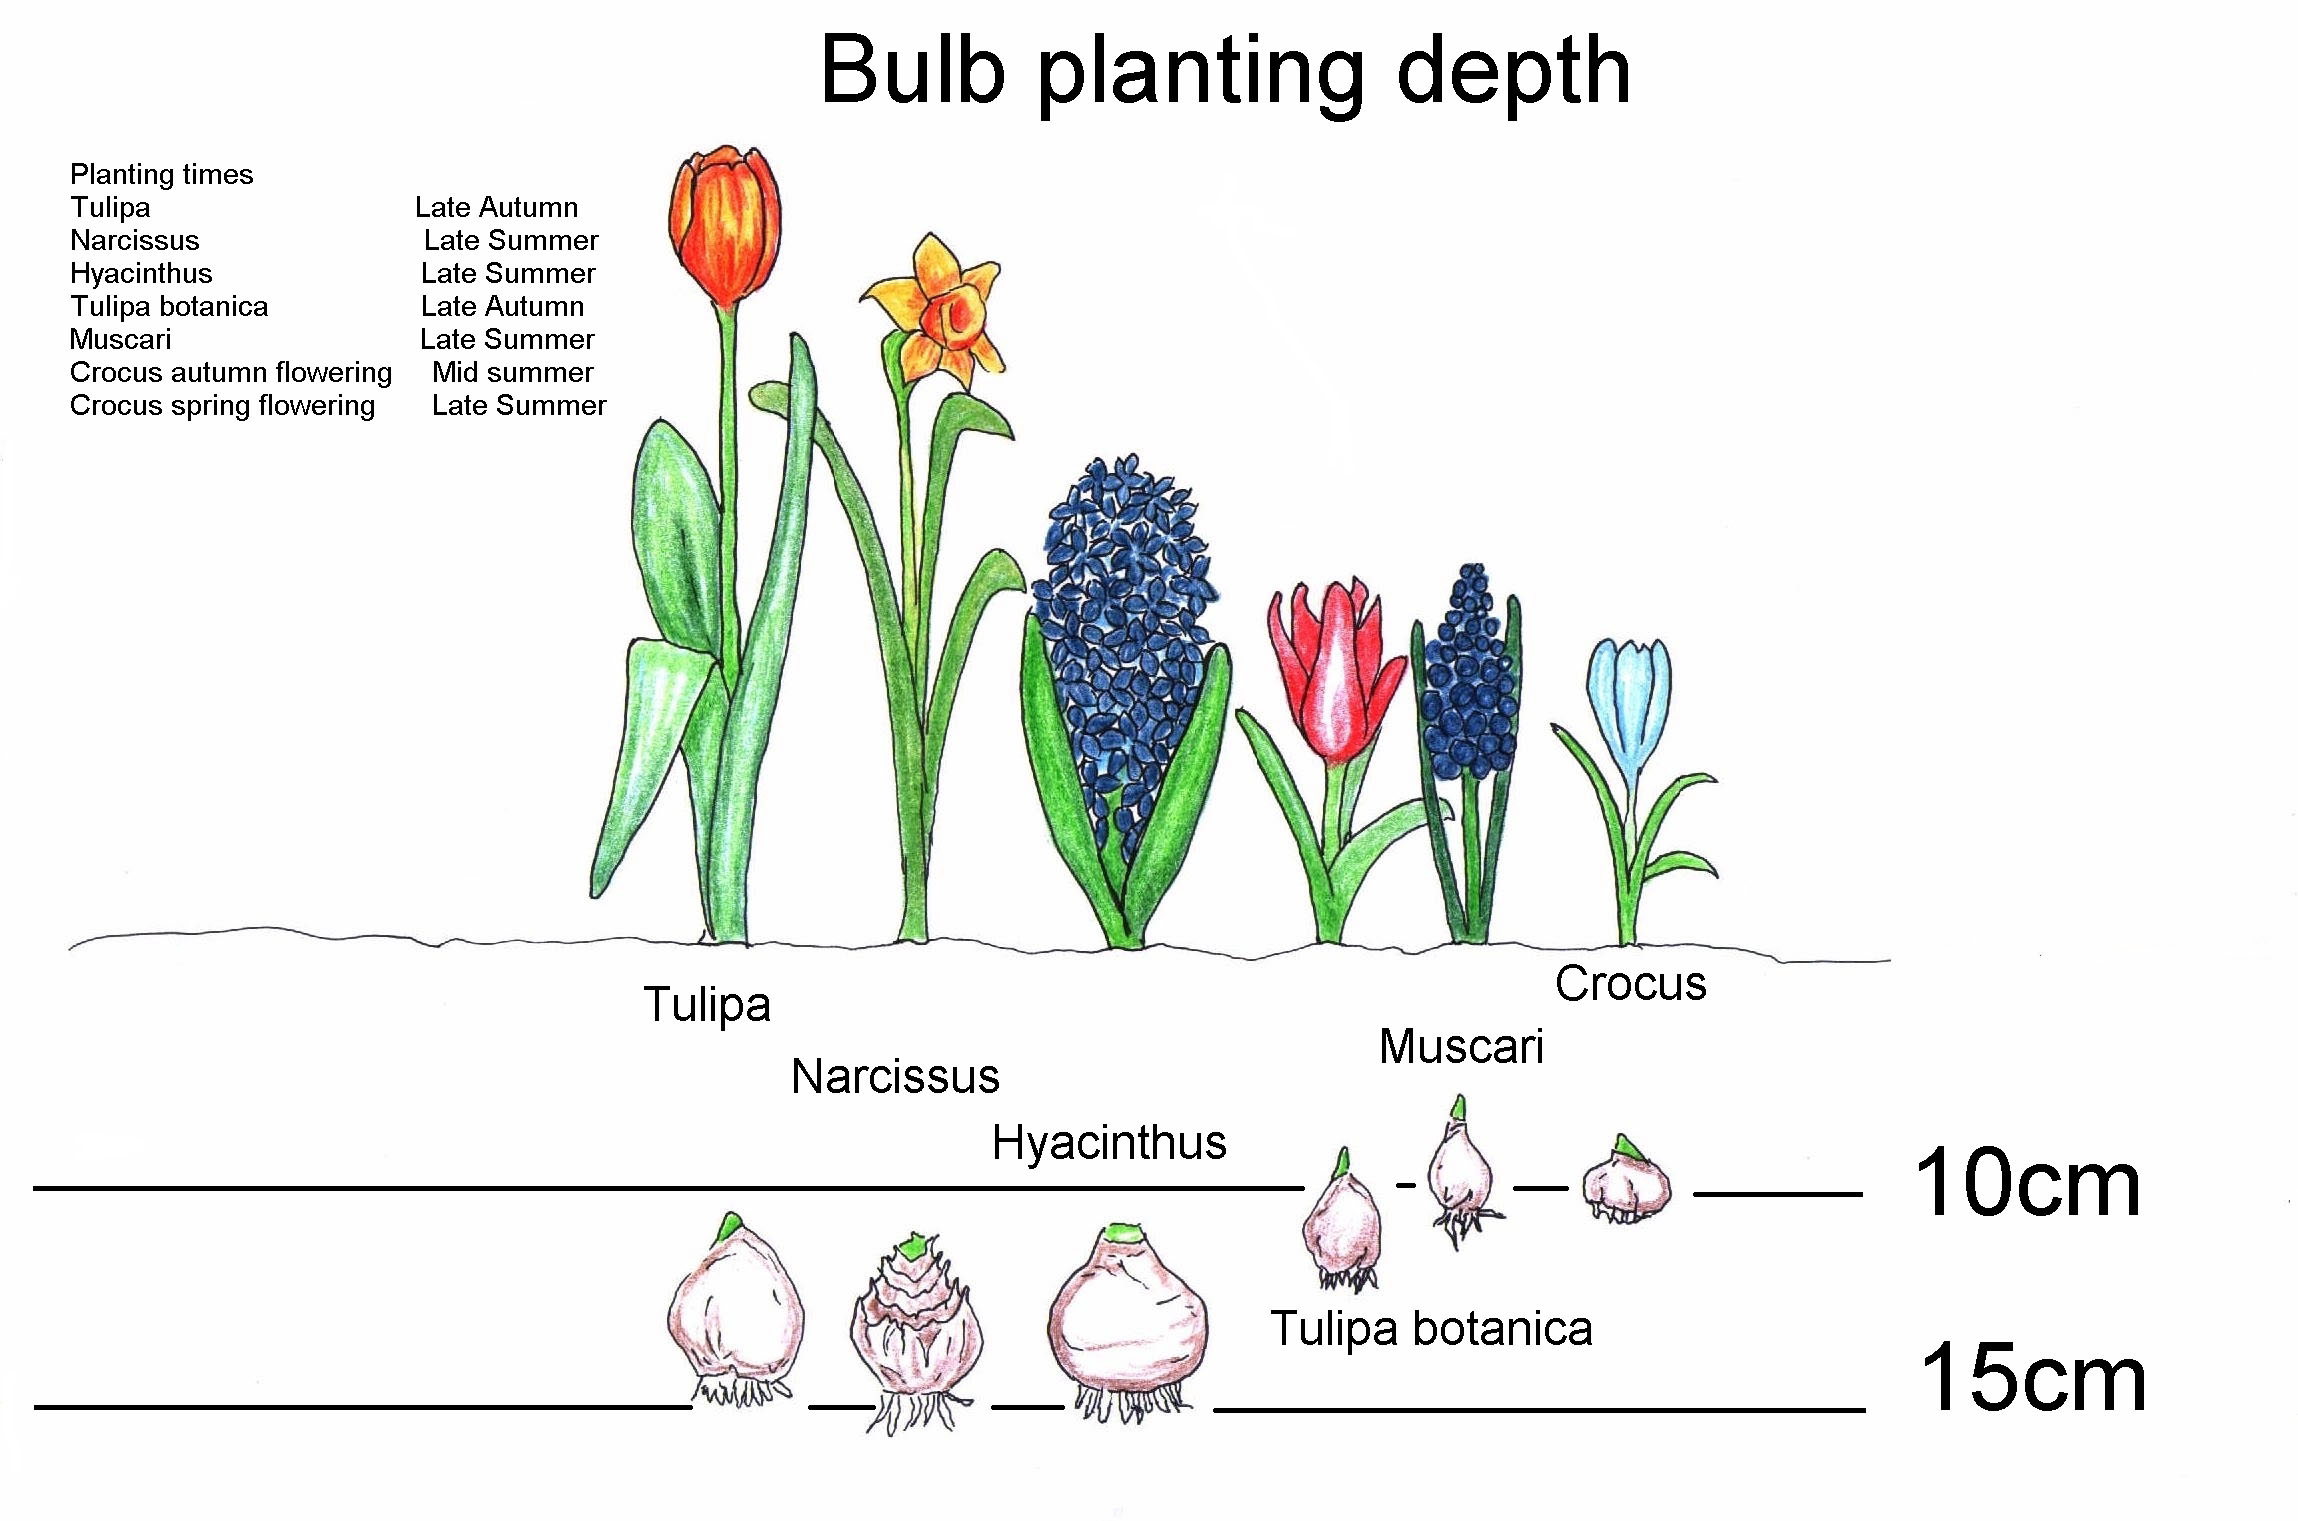
Fall is the time to plant spring bulbs!
After a long cold and grey winter there is nothing better than watching those early spring bulbs start to grow and bloom! This means the long awaited warm weather is coming!!
What to plant:
There are hundreds of different kinds of bulbs for fall planting. The most common ones are tulips, daffodils, snow drops, crocuses, alliums, muscari, frittilaria and hyacinths. Get creative with bulbs, make containers with an assortment of different bulbs, plant crocuses in the lawn! The possibilities are endless. There are many of these spring flowers that blooms at different stages of spring; early, mid and late spring. I like to plant all the different stages of blooming bulbs to ensure I have staggered bloom periods throughout the spring, there is always color this way! Your package will most likely tell you the bloom period.
The first rule of planting any bulb: Pointy side up, plant them approximately 2 1/2 times as deep as the bulb is wide – it is best to check for planting depth on the package when you get your bulbs, or check out this handy chart. Plant your bulbs in odd numbers, in clumps or clusters. Odd numbers always look better in the garden, one solitary bulb in bloom isn’t all that exciting.
| Bulb | Planting Depth | Distance Apart | Number per group for outstanding dramatic results! |
| Tulips | 8 inches | 6 inches | At Least 5 for a clump. Mass Plantings 15 or more. |
| Daffodils | 8 inches | 6 inches | At Least 5 for a clump. Mass Plantings 15 or more. |
| Allium (Small) | 2-3 inches | 2-3 inches | 9-12 bulbs |
| Allium Globemaster | 4-5 inches | 2-3 inches | 7-9 bulbs |
| Crocus | 2-3 inches | 2-3 inches | 9-13 bulbs |
| Fritillaria | 3-4 inches | 2-3 inches | 7-11 bulbs |
| Hyacinth Grape (Muscari) | 2-3 inches | 2-3 inches | 9-12 bulbs |
| Snow Drops | 2-3 inches | 2-3 inches | 9-12 bulbs |
Spring Bulbs here:
It is that time of the year again, the flip flops return to the closet and the annual appearance of the gumboots at the back door as the cool rainy weather begins to set in. The leaves begin to fall, the garden stops producing and the arduous clean-up begins. But wait, you can still have fun in the garden and play with fall colors in your yard and I am going to let you in on a few of my favorites. Decorate planters and the front entrance to your home; using pumpkins, gourds, hay, corn stalks, ornamental kales, garden mums, pansies, grasses and more. You can even grow a large variety of vegetables in the fall and in the winter! The winter birds feeding on suet can always keep you busy bird watching during the cooler fall and winter days. Fall is also a great time to determine what worked and what didn’t work in your garden this season, so let’s start making a plan for next season! If you are like me, maybe you have been doing a little seed saving all summer – fall is a great time to get those seeds cleaned up, organized and labelled for next season. Have you been busy harvesting and processing all the fruits of your labor?
Wandering around the yard in fall feels almost overwhelming this time of year – fallen plants, brown leaves and dead blooms – maybe you think about just leaving it all till spring?
I like to prepare my gardens or clean up, whichever you prefer to call it! Once spring rolls around the last thing I want to be spending time doing is clean up! I want to be able to get right into that soil and start forming new creations for the upcoming season!
Put those fallen leaves you have just raked up from fruit trees, maple trees and more to good use. Add these leaves as mulch on your flower or garden beds, or add to the compost pile for some great future organic fertilizer. Mulching your gardens can most certainly save you time weeding in the spring, mulch helps to keep weeds out all the while feeding and protecting your plants “mulch I say more”.
Dig out tubers and bulbs for winter storage; depending on your location, dahlias, gladiolus, calla lilies are among a few other precious beauties you wouldn’t want to disappear over the winter. Some of these plants can be picky and time consuming but they are certainly worth it once in bloom! I like to store my tender bulbs and tubers in boxes of saw dust or peat moss, or even a mixture of both will do. Store these boxes in a cool dark room such as a garage, basement even a greenhouse as long as they are kept dry and safe from frost. (Preparing dahlia tubers for winter storage – to the right)
Seed heads can make a dramatic change in your garden as summer turns to fall. Seed heads can provide a late season garden with dramatic visual interest and textures while attracting birds and other wildlife. Some popular and easy to grow flowers with beautiful seeds heads that I enjoy are: Allium, Poppies, Clematis, Love in a Mist, Agapanthus and Echinachea, just to name a few!!
(clematis seed head – to the left)
Depending on your gardening zone; broccoli, cabbage, cauliflower, brussel sprouts, turnip, arugula, collards, kale and a few other leafy greens are well on their way into the fall/winter growing season. These cool weather crops are generally planted in mid-July to August. In the midst of all that grows in the summer be sure to give yourself a calendar reminder to start those winter vegetables. Start seeds for cool weather crops in June, and you can also purchase seedlings from most garden centers and nurseries. Be sure to leave space for plating garlic, shallots and multiplying onions which are planted later on when the scent of winter is in the air and the soil has cooled, generally Mid-October for a bountiful spring harvest.
Planning for Next Season
Here is a sneaky little secret of mine; fall is a great time to buy all of the clearance plants at your local garden center or nursery. Purchasing perennials, even shrubs and trees that will thrive in your area can be found for a fraction of the springtime price. These plants may not look like much right now, but plant them straight away in the their new forever home and they will pop up bright, beautiful and well established in the spring, all the while saving you money! This is the best time to plant spring flowering bulbs such as; tulips, daffodils, crocuses, allium and more. Many perennial plants and perennial vegetables can be divided in the fall. Dividing mature perennials will make them healthier and create multiples of plants, all for the cost of nothing more than a little light labor. With so many great informative books available, pick up a book that might inspire some new ideas to try for next season – I always say “you can’t grow wrong” Maybe you found some plants that just didn’t grow nicely, or don’t look quite right where they were planted this season. Why not dig them up and try a new spot! I am forever re-arranging my perennials till I find they fit just right. Lastly, don’t forget about winterizing important garden tools, solar lights and garden décor. Dry them off and tuck away in a dry place – keep them looking as good as new for spring.
View this article published in Saratoga Today here: http://saratogatodayonline.com/index.php/news/news/item/2378-autumn-doesn’t-mean-the-end-of-gardening
]]>Out of space? Grow cucumbers in hanging containers!
Container gardening can be very rewarding and easy! Read more here: Container Gardening
I used large moss hanging baskets, approximately 4 gallon size. I used a combination of one third of compost from my compost bin, one third seaweed – fresh from the Pacific Ocean, one third potting soil mixture with peat and perlite for drainage. Mix well. If you do not have access to fresh Seaweed you can substitute for manure or double the compost, dried seaweed is also available in most nurseries and garden centers. I planted 2 seeds in each container and hung in the greenhouse early spring. I was hopeful of an early harvest on these so I have a continually source of cucumbers, the ones in the garden are about a month – 6 weeks behind in harvest. Once the cucumbers started blooming I gave them a good dose of Epsom salts and water as a fertilizer, I will feed them every 10 – 14 days with Epsom Salts while they are producing. Read more here: Epsom Salts
Each moss hanging basket so far, has produced 6 – 7 full size cucumbers and still blooming. The cucumbers tend to vine and trail, I have these in an area where the vines can go upwards or on the shelf behind. You could also add a small trellis to each basket for support. The cucumbers featured in these baskets are an heirloom variety called Japanese Cucumbers with a taste similar to Long English.
In the USA
In Canada
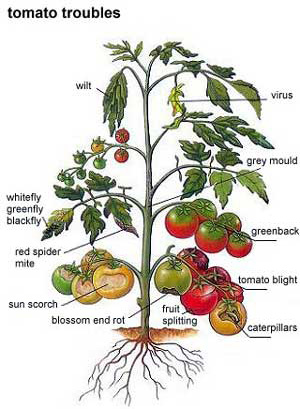
Tomato Troubles
Tomato problems may be caused by nutrient deficiencies, diseases, fungi or insects.
Assess the symptoms, then make the appropriate treatment.
Plant tomatoes where they will get at least 10 hours of light in summer. Leave room between plants for air to circulate. Alternate growing areas for tomatoes and you diminish the risk of soil-borne diseases such as bacterial spot and early blight. Plant your tomato seedlings up to the first true leaves.New roots will quickly sprout on the stems. More roots means more fruits.
1. Yellowing Leaves
Yellowing and discolored leaves where the veins are still green is a sign of either a phosphorous or calcium deficiency. Amend this with an organic fertilizer, try epsom salts. Learn more about epsom salts here: https://backyarddiva.ca/garden-tips-6/
2. Insects
Horn worm, aphids, moth and beetles can cause severe damage to your fruit. Remove and destroy insects as soon as possible. Use an organic natural pesticide spray to help deter the smaller insects. Recipe here: https://backyarddiva.ca/homemade-natural-pesticide/
3. Splitting Fruit
Like the foliage that’s dying back, splitting tomato fruit is a sign of uneven watering. As the fruit is ripening if the plant receives too much water the skin will split because the fruit’s skin can no longer expand. Provide your plants with a good 2 – 3″ inch layer of organic mulch such as straw, pine needles, or shredded bark. This will maintain more regular soil moisture levels, and you’ll deal with less splitting.

Great reference book!
Get it here:
4. Sun Scorch
Sun scorch is irreversible once it’s impacted a tomato, but its progression can be slowed. You can leave exposed fruit on the vine and cover it with lightweight screen, shade cloth, or straw to protect if from further damage. You can also harvest scorched tomatoes and let them finish ripening on a windowsill or kitchen counter.
5. Greenback
Greenback is a disorder which generally occurs in greenhouse grown tomatoes. The area around the stalk does not. It remains resolutely green or yellow and tougher in texture. A combination of factors including too little potassium and phosphorous and too much direct sunlight and high heat are to blame. Cover your tomatoes with a shade screen, plenty of ventilation and amend soil with organic fertilizer.
6.Grey Mould/Leaf Mould
Leaf mould can develop rapidly to cause significant yield loss in greenhouse-grown tomatoes. It is rarely seen on outdoor crops. Provide ample ventilation to avoid an excessively moist atmosphere. Try to avoid wetting the leaves when watering. This is particularly important when watering in the evening, as the leaves may then stay wet throughout the night. Pick off infected leaves as soon as they are seen, and dispose of affected plants and all debris at the end of the season.
7. Blossom End Rot
Blossom end rot generally develops when the fruit’s demand for calcium exceeds the supply in the soil. This may result from low calcium levels in the soil, drought stress, excessive soil moisture, temperature fluctuations due to rain or over watering . This disease does not spread from plant to plant in the field, nor from fruit to fruit. Tomatoes planted early in cold soil are likely to develop blossom end rot on the first fruits, planting tomatoes in warmer soils helps to alleviate the problem. Add more calcium to your tomatoes when they begin to bloom: espom salts and/or milk is a great way to get that calcium to your tomatoes.
8. Tomato Blight
Blight is caused by fungus, symptoms tend to become prevalent during the hotter months. This disease produces brown to black spots on older leaves. If severe, the fungus also attacks stems and fruit. Affected leaves may turn yellow, then drop, leaving the fruit exposed to sunburn. Sanitation is the best control. Remove all diseased plant tissue on the ground, as the fungus overwinters on leaf debris. Do not plant tomatoes in the same place next year. Space plants farther apart to improve air circulation. Avoid overhead irrigation.
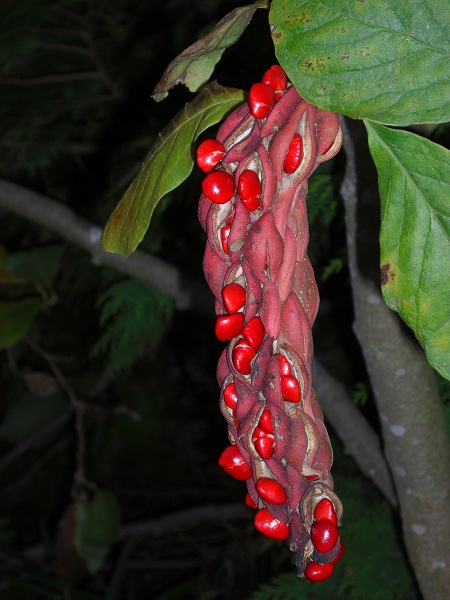
Have you ever noticed those big pinkish/brown pine cone looking things hanging from an old established Magnolia Tree in the fall?
Well, they are seed pods! I see them every year on my giant Magnolia that is at least 50 years old.. last fall I decided I would try to grow some of these seeds, the tree is generally loaded with these long pods often reaching up to 12 inches and rather heavy. So after much google research I went for it – the entire process seemed rather daunting and complicated after reading upwards of 15 different HOW TO websites and you tube videos. So here is my easy version explained.
The red seed in the pod is what you are looking for, collect as many as you can. I started off with about 60 red seeds, at the end of everything about 35 sprouted enough to transplant. Some sites will tell you to collect your seeds once the pod has dried in September-October and not to force open the pinkish/brown flesh. I however did not have the patience and forced open the pinkish pods to get to the red seed.
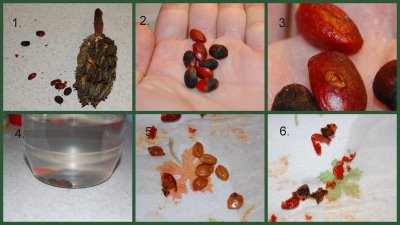 You will now need to remove the red or reddish-orange flesh. Remove the seeds from the pod and place them in a bowl of warm water for 24 hours. This will soften the flesh so that you can remove it with your fingers. It is easiest to do this in the water with several seeds in your hands at a time – I kept the kitchen sink running while completing this step. You can also rub the seeds on hardware cloth or a metal screen to aid in the flesh removal. Any seeds that don’t sink to the bottom after soaking for the 24 hours should be discarded. The seeds will also be covered with an oily residue; rinse with warm water. The red skin tends to have a slight rotting smell, this is ok.
You will now have small hard black seeds which you will need to slightly break open or scar: Nick each seed with a sharp file or rub several together between 2 sheets of sandpaper to scar the hard seed coat. This will help in the germination process. This step can seem daunting and almost impossible. I used a small paring knife and held down the seeds between cloth – otherwise you will find them shooting all over the place. (Different varieties of Magnolia may produce a beige/brown seed)
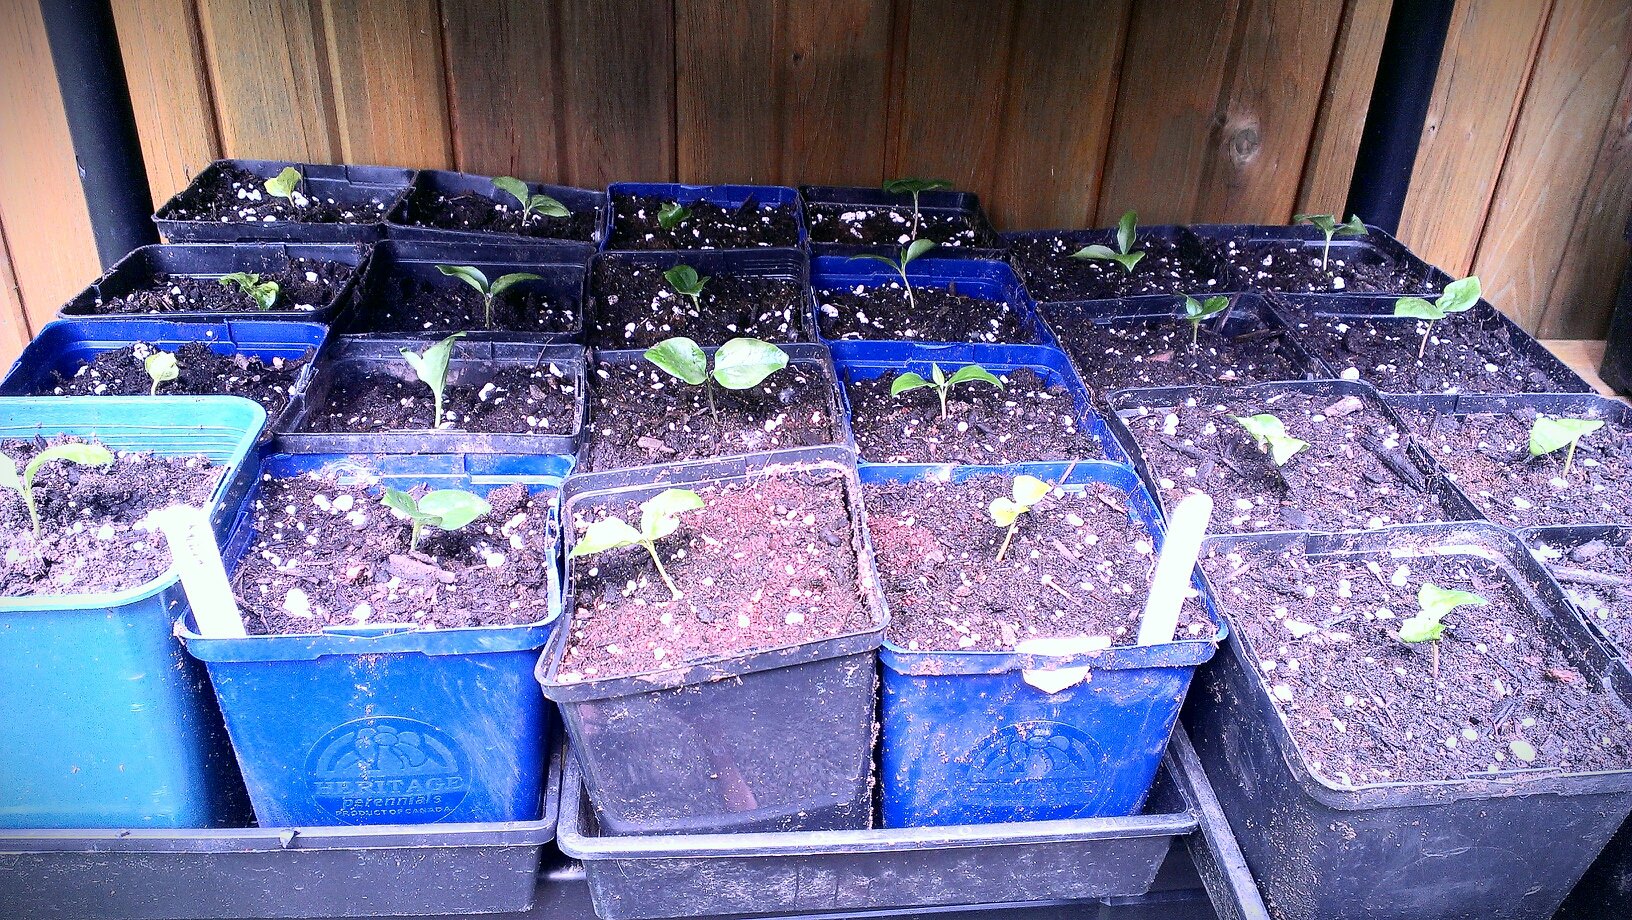 Now place the black seeds into a moist bag of seed starting mixture or sterile potting soil in the refrigerator for approximately 4 – 6 months , I used a small ziploc sandwich bag. This process is called stratification. Do not let the bag dry out, no need to manipulate it during this time, the seeds will slowly start to germinate. Once all your seeds have sprouted go ahead and plant them in a sterile potting soil mixture into small pots, 6 packs or seed starting trays, remember to keep moist and warm, not overly wet. Once the true leaves have appeared you can then transplant into larger pots.
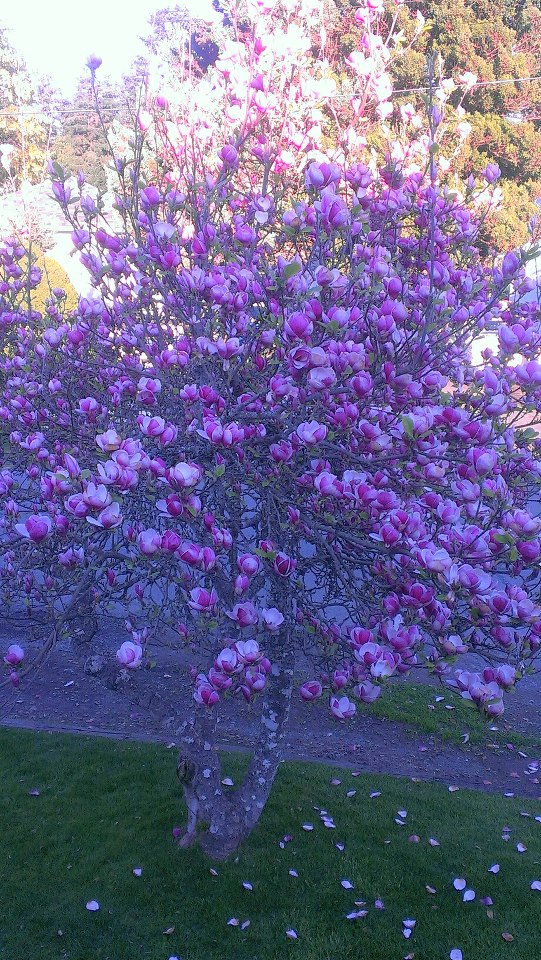
My Magnolia in full bloom
Magnolias prefer a slightly acidic, well-draining loam. For the first few years, maintain a layer of mulch 3 inches deep around the roots to protect them. There are over 80 types of exotic magnolia varieties ~Enjoy!
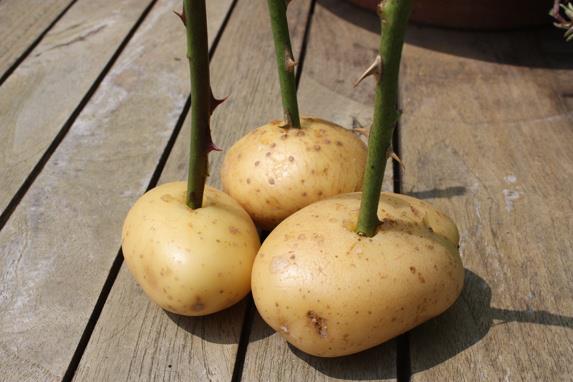
Propagate roses with potatoes!
Potatoes provide just the right amount of nutrients and moisture to rose cuttings, allowing them to develop healthy roots.
This also works for other wood stemmed plants.
1. Cut an 8-inch tip piece of healthy rose bush at a 45-degree angle. Be sure to use clean pruning clippers. Use plant pieces immediately or place them in a plastic bag on ice if you are not going to use them immediately.
2. Snip off dead flower heads and hips down to the first set of healthy leaves.
3. Fill a medium-size flower pot with high-quality potting medium. Moisten the soil slightly.
4. Create a 3-inch hole in a potato (with the eyes of the potato removed) using a clean screwdriver that is the same diameter as your rose clipping.
5. Brush some rooting compound on the cutting and shake off the excess. Place the cutting into the potato hole.
6. Make a hole in the potting medium for the potato with a clean spoon.
7. Place the potato into the hole, allowing only the cutting to be exposed.
8. Cover the cutting with an empty and clean soda bottle to create a mini-greenhouse. Twist the bottle slightly to be sure that it is solid in the soil.
9. Place the pot in a warm and light location away from direct sunlight. Remove the bottle from the cutting for a few minutes daily to allow the cutting to breathe. Do not disturb the cutting until you see new growth forming. Keep the soil moist.
10. Pull lightly on the cutting and if you feel resistance, roots have developed.
11. Relocate the pot, without the bottle, to a sunny location with more direct light and allow the cutting to grow until you will harden it off. Keep the soil moist.
12. Harden off the cutting, by gradually exposing it to outdoor temperatures, starting with a few hours each day in a sheltered location with plenty of light but no direct sun. Keep the soil moist.
13. Transplant into the garden after one week of hardening off.
Don’t let this get confusing with all the steps.. in a nutshell; remove eyes from potato, stick a healthy rose clipping in the potato (with rooting compound on fresh cut), bury in moist soil and nature will take care of the work!
]]>Fight Cabbage Worms, Aphids, Tomato Worms and Beetles and other little pests organically!!!
This simple solution WORKS great, is so simple to make and will not harm your plants.
You will need:
1 Bulb Garlic
2 tablespoons regular dish-soap
1 small rhubarb leaf (optional – I will explain the purpose of this later)
1 – 2 fresh hot chili peppers or 2 tablespoons dried chili flakes
about 1 liter of water
fine metal sieve
small pot
spray bottle
Simply multiply recipe if larger quantities are needed.
Instructions:
Boil all ingredients together for 5-10 minutes – leaving out the dish-soap Allow mixture to cool completely, strain through sieve into spray bottle, then add dish-soap.
Spray infected area of your plants consistently for 2 – 4 days, and every second or third day thereafter or as needed (if infestation is really bad, spray twice daily). DO NOT SPRAY this mixture on your plants in the hot sun, it may turn the leaves brown. The cool evening/early morning is the time I find the most effective. You can use this mixture on any plant, vegetable or herb.
Rhubarb garden spray is an effective spray for controlling aphids and other sucking insects, as it suffocates them. It is excellent for all plants especially roses as the rhubarb also helps control black-spot on the leaves. The garlic and pepper deters pests from your plants and the dish-soap leaves a slight coating on leaves. There are many that will say NOT to use rhubarb leaves as an insecticide on edibles, because the rhubarb leaves are toxic to humans and animals when ingested. There is such a minor amount in this recipe it is of no concern to me – I use this recipe constantly. Please make sure you dispose of rhubarb leaves out of children or animals reach. If you have a very minor infestation of aphids, often a simple solution of just dish-soap and water will do the trick!
There are many homemade pesticide recipes available – this is my personal preference that I would like to share with you all, please look into other options to best suite your needs by doing a google search.
Find supplies here:
USA
Canada